Previous Story
The Price Action Cheat Sheet
Posted On 19 Jul 2014
Comment: 0
DailyFX.com –
Talking Points:
- This article is an extension of our series on the topic of price action analysis.
- In this article, we look at characteristics of trading in each of the three primary market conditions.
Over the past three articles in our price action series, we’ve shared strategies and methods that traders can use to address each of the three primary market conditions.
As we explained in The Guiding Hand of Price Action, markets will generally display one of three tonalities; and depending on which type of market environment is being displayed, traders should look to adjust their approaches and their strategies to most adequately address that overriding market condition.
In this article we’re going to provide an overview of these three market conditions; along with tips, tools, and suggestions for traders to most appropriately tackle each. We begin with a table that provides a quick overview of the pros and cons for each condition; and for each condition we’ve outlined an entire section below with a link for each topic heading. If you’d like to find out more information about any of the conditions below, please click on the heading for that section and you’ll be taken to a more detailed article on that topic.
|
Condition |
Pros |
Cons |
How to handle |
|
Consistency, stop placement |
Limited up-side potential |
Look for higher winning %’s & less aggressive risk-reward ratios |
|
|
Huge profit potential |
higher failure rates (false breaks) |
Significantly more aggressive risk-reward ratios |
|
|
Market bias (direction of trend) |
Difficult entry timing |
Multiple Time Frame AnalysisMinimum 1:2 Risk-Reward |
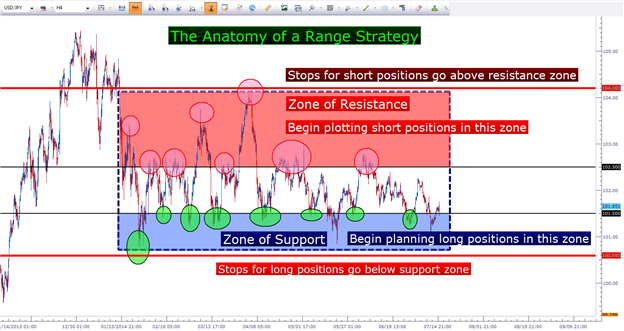
The Range-bound market condition is most common condition that traders will see in most markets; and this is where price discovery takes place.
Ranges pop up when a market is seeing roughly equal buying and selling. This means that prices will usually be caught within previously defined support and resistance levels; and this can be massively advantageous for the trader.
One of the biggest allures of the range is consistency…
Taken from The Best Environment for Retail Forex Traders, by James Stanley
The reason that this environment can be so advantageous is due to stop placement. Because the range has defined support and resistance; traders can look to place their stop on long positions below support or their stop on short positions above resistance. This way – if the range breaks, the trader can close the position out quickly with their pre-set stop, and can look to avoid taking a massive loss when a breakout runs against them.
This is a big reason why the range-bound market is often considered the Best Market Condition for Retail Forex Traders; and this is backed up with statistics from the DailyFX Traits of Successful Traders series.
Because the range has a tendency to respect support and resistance, this can offer greater consistency in the setup as opposed to other conditions such as the trend or the breakout.
The down-side of trading ranges is the potential for limited upside. After all, if we buy in an range and take prices to resistance – if that range is to continue then prices will likely come back down, right? This means that the top-end profit in the range is already defined by the distance between support and resistance.
This is likely one of the reasons that many new traders attempt to avoid ranges, despite this being the most amenable environment for them.
The fact-of-the-matter is that every one of these market conditions has down-sides, and for most retail traders – the range-bound market conditions presents the least imposing of these downsides.
Every range breaks eventually… it’s just a matter of time, and patience.
Trading the breakout is the direct opposite of trading the range
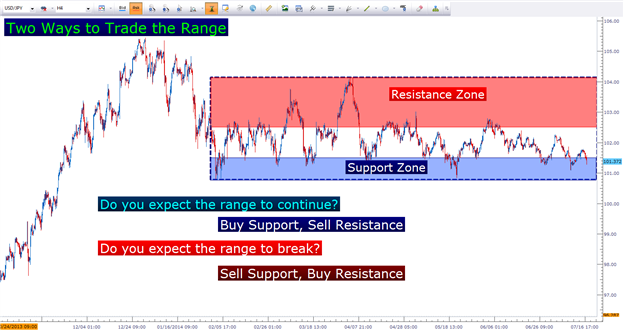
Image taken from To Break, or Not to Break; by James Stanley
The transitory condition from a range to a new trend is a breakout. Breakouts often come around news events, data announcements, or geopolitical surprises. This new information gets priced into markets fairly quickly – as no traders want to be caught off-guard, market makers most definitely included.
The mayhem that can ensue around these breaks are part of what make them so difficult to harness. This heightened activity can often see an increase in volatility (which is really just another way of saying ‘risk.’) This extra volatility means that price movements can increase on both sides of the spread.
The simple act of breaking support or resistance can elicit even more activity, as new traders rush into the market in an attempt to take advantage of ‘new highs’ or ‘new lows.’
The up-side of this condition is that if the trader is able to find themselves on the right side of the move – and if that move is to continue, the trader can put themselves in a position to profit handsomely from the trade.
The downside is the false-breakout; and that’s the prospect of that break of support and resistance reversing, only to see the pair continue to trade in a range.
This fact coupled with the enhanced volatility that will generally accompany these breaks means that traders need to expect significantly higher rates of failure with breakout strategies. While range traders might look for a 60% success ratio, and trend traders between 40-50%; breakout traders are often looking at something significantly more modest along the lines of 25-30%.
I realize this sounds bad; the prospect of winning only 1 out of 4 trades rarely sounds ‘good’ to a new trader. But what needs to be kept in mind is that when that one trade does win – the potential up-side could be significant.
This is the essence of the breakout – if the move is to continue, the trader wants to reap as much of that as they can; but if the break isn’t going to continue running, the loss needs to be minimized.
So of extreme importance with the breakout are aggressive risk-reward ratios of 1-to-3 (risking $1 to win $3), 1-to4 (risking $1 to win $4), or 1-to-5 (risking $1 to make $5).
The first of our price action strategy series addressed the trending market condition.
After prices have broken out from previously-defined support and/or resistance, if the movement is to continue, a new trend will form.
Up-trends will usually show as a series of ‘higher-highs’ and ‘higher-lows,’ while down-trends will display a series of ‘lower-lows’ and ‘lower-highs.’
Higher-highs and higher-lows in GBPUSD over the past year
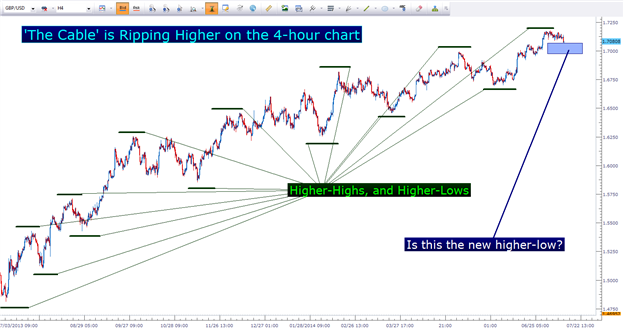
Taken from How to Attack Trends Using Price Action; by James Stanley
This can be massively beneficial for a trader, because while future price movements are always going to be unpredictable, the simple fact that a market is trending shows that there has been (and may continue to be) a bias. This is what leads to the saying ‘the trend is your friend.’
So, if prices are trending higher – that means there is a positive bias in that market… further meaning that traders should look to get on the side of that positive bias by buying. And if looking to buy – traders want to try to ‘buy low and sell high.’
So, the trader can simply wait for prices to make a ‘higher-low’ in a bullish market, and then can look to buy so that if that bias does remain, and if the longer-term trend can come back – then the trader can look to reap a large profit from the trade.
There is just one problem: You’ll never know that we’ve hit a ‘higher-low’ until price action confirms this… and if you wait for confirmation before placing your trade, you can miss a significant portion of the up-side in the move.
So, trend traders are usually looking at lower success ratios than those of range-traders; yet still higher than those of breakout traders.
But because trend traders have the luxury of a bias working in their positions, they may be able to take out significant up-side if that bias is to continue.
Trend traders need to look for risk-reward ratios of a minimum 1-to-2, so that even if they only win 40% of the time – they stand a chance to profit on the strategy.
— Written by James Stanley
Before employing any of the mentioned methods, traders should first test on a demo account. The demo account is free; features live prices, and can be a phenomenal testing ground for new strategies and methods. Click here to sign up for a free demo account through FXCM.
James is available on Twitter @JStanleyFX
Are you looking to take your trading to the next level? The DailyFX 360° Course offers a full curriculum, along with private, weekly webinars in which we walk traders through dynamic market conditions using the education taught in the course.
If you’d like a customized curriculum based on your current experience level, our Trader IQ course via Brainshark can offer assistance. Please click on the link below to complete our Trader IQ questionnaire.
Would you like to trade alongside seasoned professionals throughout the trading day? DailyFX On Demand gives you access to DailyFX Analysts during the most active periods of the trading day.
Would you like to enhance your FX Education? DailyFX has recently launched DailyFX University; which is completely free to any and all traders!
Source: The Price Action Cheat Sheet