Previous Story
Tuesday 7th April: Daily technical outlook and review

EUR/USD:
Weekly timeframe perspective: The weekly timeframe shows that the buyers and sellers remain pulling for position just below a major weekly swap level coming in at 1.1096. A break above this barrier could stimulate further upside towards a weekly supply area positioned at 1.1449-1.1278.
Daily timeframe perspective: From this angle, we can see that yesterday’s action saw the market sell off from just below the 1.1051 high (26/03/15). Further selling from this point would likely see price challenge a daily swap level at 1.0716.
4hr timeframe perspective: The 4hr timeframe shows that a few candles after the Euro opened (1.1000); price sold off and found supportive pressure just above 1.0900, which consequently wiped out most of Friday’s gains in the process.
Considering where price is trading on the higher timeframes at the moment (see above), we believe that buying this pair is risky. That is certainly not to say it cannot be done though! For example, check out the 4hr decision-point demand area at 1.0862-1.0887, sitting just below 1.0900. This barrier looks great for a bounce trade. However, we would still recommend playing safe here – waiting for lower timeframe confirmation, and only going for small, easy-to-reach targets may be the best path to take.
A break below this 4hr decision-point demand area on the other hand would, in effect, be our cue to begin watching for price to retest this area as supply, since at that point, the path south would likely be clear down to at least 1.0800.
Let’s see what the market brings today…
Current buy/sell orders:
- Buy orders: 1.0862-1.0887 [Tentative – confirmation required] (Predicative stop-loss orders seen at: 1.0854).
- Sell orders: Flat (Predicative stop-loss orders seen at: N/A).
GBP/USD:
Weekly timeframe perspective: The weekly timeframe shows that the GBP remains in a freakishly steep downtrend at the moment, and is, at the time of writing, seen lingering just below a recently broken weekly Quasimodo line coming in at 1.5007. Let’s take a look to see what we can find on the lower timeframes…
Daily timeframe perspective: from the daily timeframe, we can see that in order for further selling to be seen on the weekly timeframe, the bears will need to sharpen their claws and begin digging, as there’s a long-term daily demand zone blocking their path seen at 1.4643-1.4823.
4hr timeframe perspective: For those who read our last report on this pair, you may recall us mentioning that if prices were to get above the 4hr Quasimodo resistance level at 1.4953, we’d then be very interested in shorting this market around the 4hr resistance zone at 1.5008-1.4975. This, as you can see did indeed happen, and as a consequence we’re now short from 1.4969.
The reasons for entry are as follows: (for levels please see above)
- Overall downtrend is still very much in play.
- Clearly definable 4hr resistance zone.
- Large psychological number 1.5000 seen deep within the aforementioned 4hr resistance zone.
- Weekly Quasimodo resistance seen deep within the aforementioned 4hr resistance zone.
Our team has taken partial profits at 1.0900 already and moved the stop to breakeven. Ideally, we do NOT want price to close back above 1.4900. Instead, what we’re looking for is price to take out the 1.4866 hurdle, and potentially the 4hr decision-point demand area seen below it at 1.4809-1.4839.
Current buy/sell orders:
- Buy orders: Flat (Predicative stop-loss orders are seen at: N/A).
- Sell orders: 1.4969 [Live] (Predicative stop-loss orders are seen at: 1.5016).
AUD/USD:
Weekly timeframe perspective: Over the past two months or so, the buyers and sellers have been seen pulling for position around a weekly demand area at 0.7449-0.7678, which, as you can see, also boasts long-term trendline convergence from the low 0.4775. We’re not usually one to make predictions here, but with the lower low that formed deep within the weekly demand area last week at 0.7532, coupled with the fact that the Aussie is in a severe downtrend at the moment, it looks as though this area will be taken out sooner or later.
Daily timeframe perspective: The latest coming in from the daily picture shows that price has been wrestling with a daily demand area at 0.7449-0.7598 (located deep within weekly demand at 0.7449-0.7678) since Wednesday last week, which, if you look back to the weekly chart, you’ll notice is located deep within the aforementioned weekly demand area.
4hr timeframe perspective: The AUD/USD pair fell during the course of yesterday’s sessions, completely wiping out any gains the market had picked up from Friday’s NFP-induced rally. This move forced price below the 0.7600 handle, which subsequently saw price hit a 4hr decision-point demand area seen at 0.7569-0.7592.
In view of the higher-timeframe structure, we know that price is trading around overall demand (see above) at the moment, so a move higher could still be on the cards. That being said though, the Aussie is also in a strong overall downtrend at this time. Therefore, entering long at this 4hr decision-point demand area is still risky even with the higher-timeframe demand confluence. Sitting tight and waiting for lower timeframe confirmation, preferably above 0.7600, would be the only way we’d trade this area long! A break lower on the other hand, would likely see increased selling interest down to at least the mid-level number 0.7550.

Current buy/sell orders:
- Buy orders: 0.7569-0.7592 [Tentative – confirmation required] (Predicative stop-loss orders seen at: 0.7565).
- Sell orders: Flat (Predicative stop-loss orders seen at: N/A).
USD/JPY:
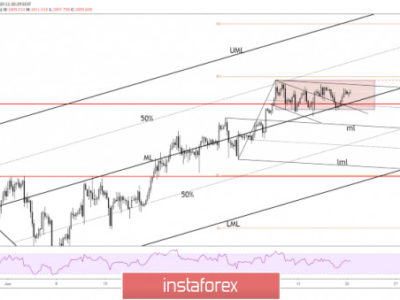
Weekly timeframe perspective: The weekly chart shows that the buyers and sellers are currently battling for position within a small weekly decision-point demand area at 118.22-119.40. A move north from here could take us all the way to the weekly Quasimodo resistance level seen at 122.18. Conversely, a break below here could attract further downside towards the low 116.86, or even the major weekly swap level seen just below it at 115.50.
Daily timeframe perspective: From the pits of the daily timeframe, we can see that price is currently capped between a minor daily support level coming in at 118.32 (located deep within the aforementioned weekly decision-point demand area), and a daily supply area seen at 121.18-120.08.
4hr timeframe perspective: The open (118.83) saw the buyers take immediate control. Price broke above and retested 119.00 as support, and then spring boarded itself north up to a 4hr supply area coming in at 119.90-119.63 (formed from the NFP).
Taking into account that price is located within weekly demand (see above) at the moment; the reaction from the aforementioned 4hr supply area may well be short-lived. The most we see price dropping from here is down to the 4hr decision-point demand area coming in at 118.91-119.10.
Now, our team has agreed that since the 4hr supply area was formed during the NFP reaction i.e. pro money involvement, there may be unfilled sell orders left within this zone. Therefore, if lower timeframe selling confirmation is seen, we’d consider taking a small position from here and target the aforementioned 4hr decision-point demand area. Once, or indeed if price reaches this area of demand, we intend to shift our attention to longs for the following reasons:
- Located within the aforementioned small weekly decision-point demand area.
- Boasts trendline convergence from the candle close 116.98 (03/02/15).
- Additional round-number support from 119.00.

Current buy/sell orders:
- Buy orders: 118.91-119.10 [tentative – confirmation required] (Predicative stop-loss orders seen at: 118.88).
- Sell orders: 119.90-119.63 [tentative – confirmation required] (Predicative stop-loss orders seen at: 119.92).
USD/CAD:
Weekly timeframe perspective: For over two months now, price has been seen teasing the underside of a weekly Quasimodo resistance level coming in at 1.2765. A close above this level could spark further buying interest up to another weekly Quasimodo resistance level seen at 1.3014.
Daily timeframe perspective: From the daily picture, we can see that this pair is clearly beginning to chisel out a consolidation zone between the daily demand area at 1.2350-1.2468, and a daily supply area seen at 1.2833-1.2742 (encapsulates the aforementioned weekly Quasimodo resistance level). The current location of price at the moment is around the lower limit of this range.
4hr timeframe perspective: The open (1.2467) saw very little action above the 4hr demand area at 1.2408-1.2450 (located within daily demand at 1.2350-1.2468). The buyers did, however, attempt to make a run for it, but as you can see, were stopped flat on their feet by the round-number resistance at 1.2500. Given that there is somewhat of a tug of war going on between the weekly and daily timeframe structures (see above) at the moment, trading the 4hr timeframe will have to be done so with caution.
Building on that, a close above 1.2500, would effectively be our cue to begin watching for price to retest this number as support, since the path north would then likely be clear up to the 4hr decision-point supply area coming in at 1.2572-1.2553. In trading this retest, we would advise waiting for price to be confirmed on the lower timeframes before diving in, simply because you could potentially be buying from higher-timeframe weekly sellers!
The 4hr decision-point supply area just mentioned above is also an area we currently have noted down. The reason being is it was here where well-funded traders were very active when the NFP data was released on Friday, meaning there may very well be unfilled sell orders still remaining. Place it on your watchlist guys!

Current buy/sell orders:
- Buy orders: Flat (Predicative stop-loss orders seen at: N/A).
- Sell orders: Flat (Predicative stop-loss orders seen at: N/A).
USD/CHF:
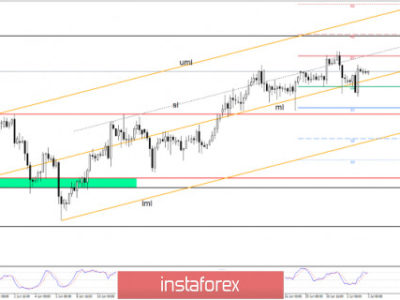
Weekly timeframe perspective: Last week’s action ended with price respecting the 0.9663 weekly swap level as resistance. In the event that further selling is seen from here this week, we might, just might, see prices challenge the weekly decision-point demand area at 0.9170-0.9343.
Daily timeframe perspective: Yesterday’s daily candle shows buying pressure was seen from the daily demand area at 0.9449-0.9534. This zone remains a key obstacle to a move down towards the daily demand area coming in at 0.9170-0.9246, which, if you look back to the weekly chart, you’ll notice is located deep within the aforementioned weekly decision-point demand area.
4hr timeframe perspective: The open (0.9509) saw price consolidate for a few candles, and then drop down to retest 4hr demand at 0.9449-0.9500 (located deep within daily demand area mentioned above at 0.9449-0.9534). It was from here the Swiss pair saw aggressive buyers come into the market, pushing prices up to a 4hr decision-point supply area coming in at 0.9608-0.9583. For those who read our last report on this pair, you may recall us mentioning that if price were to reach this area, we’d look to enter short at market. Our fill came in at 0.9578, with a stop placed just above at 0.9618.
If one were only looking at the 4hr and daily timeframes here – it’s clear our team has just sold into demand! That may be the case, but with the weekly timeframe in the mix showing price retesting a major level as resistance, with room to move lower (see above), we remain confident in our decision for the time being.
We are going to look to trail price down to around 0.9536, where partial profits will be taken and our stop moved to breakeven. We then plan to let the rest of our position run, watching closely for price to engulf the 4hr demand area below at 0.9449-0.9500 (located deep within the daily demand area mentioned above at 0.9449-0.9534).

Current buy/sell orders:
- Buy orders: Flat (Predicative stop-loss orders seen at: N/A).
- Sell orders: 0.9578 [Live] (Predicative stop-loss orders seen at: 0.9618).
DOW Jones 30 (US 30):
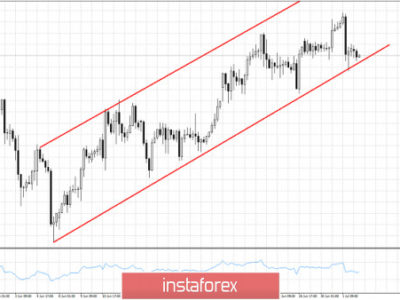
Weekly timeframe perspective: From the weekly timeframe, we can see that the DOW is in an incredibly strong uptrend at the moment, and has been for the past six years! However, price seems to of hit a barrier of resistance coming in around the 18098 region. Let’s take a look to see what the lower timeframes make of this…
Daily timeframe perspective: The daily timeframe shows that this market is currently being supported by a small, yet clearly resilient, daily decision-point demand area at 17561-17655, which, as you can probably see, also boasts trendline convergence from the low 15849.
4hr timeframe perspective: A few candles after the market opened (17618); the DOW took off like a rocket from 4hr demand at 17546-17633 (located deep within the aforementioned daily decision-point demand area), forcing prices up to a 4hr supply at 18009-17939.
Given that the weekly timeframe, although still in a strong uptrend, is seeing resistive pressure at the moment, and the daily timeframe shows price in demand, where does this leave us on the 4hr timeframe? Well, shorting from the aforementioned 4hr supply may be a possibility, but let’s not forget that by doing so, you’d essentially be selling against not only the overall weekly trend, but also daily demand as well (levels marked above). The most we’d look to target out of a short from here would be the high 17811 (minor swap level).
A close above the current 4hr supply on the other hand, would likely open the gates for intraday buying up to the 18098 weekly level. For us to be confident the overall trend is continuing, we’d need to see a sustained move above this weekly level on this timeframe before committing to longs.
To sum up, we have no interest in trading this index at this time; there are just too many conflicting signals. We only risk money when the odds are truly in our favor.

Current buy/sell orders:
- Buy orders: Flat (Predicative stop-loss orders seen at: N/A).
- Sell orders: Flat (Predicative stop-loss orders seen at: N/A).
XAU/USD (Gold):
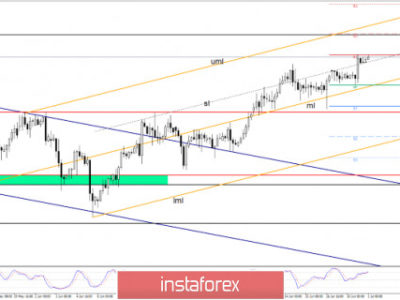
Weekly timeframe perspective: From the weekly timeframe, we can see that price has just recently pierced the top of a small weekly decision-point supply area at 1223.1-1202.6. This move has likely cleared the path north for further upside towards a weekly swap level coming in at 1251.0.
Daily timeframe perspective: It should come as no surprise when we tell you that the recent move on the weekly timeframe has also taken out a daily supply area at 1223.1-1213.0, since this area is located deep within the aforementioned small weekly decision-point supply area. This move, as per the daily timeframe, has potentially cleared the path north up to daily supply at 1236.6-1227.7, which is, as far as we can see, now effectively a key obstacle to a move towards the aforementioned weekly decision-point supply area.
4hr timeframe perspective: The open (1202.7) saw the buyers take immediate control, which saw prices hit and spike though a 4hr resistance zone at 1223.1-1219.0, possibly clearing the path north up to a 4hr supply area seen at 1236.6-1231.8 (located very deep within the daily supply area mentioned above at 1236.6-1227.7).
Let’s just recap here so that we’re all on the same page. Essentially, we have now seen three supply areas engulfed. These supply areas, as you can probably see, all have the same upper limits. The key point to this is that the path north appears clear for further buying according to not only on the weekly timeframe, but the daily and 4hr timeframes as well.
This is great. What next? Buying – with a potential resistive-free area on the horizon, we currently have our eye on the following levels:
- The small 4hr flip level at 1208.4. Lower timeframe confirmation is a must here – nothing worse than getting stopped out on a fakeout, is there?
- The small 4hr decision-point demand area at 1191.3-1194.1, which also boasts trendline convergence from the low 1142.5. Depending on the way price approaches this zone, we may consider setting a pending buy order here when, or indeed if the time comes.
The ideal take-profit target for any trades taken from these levels is the lower limit of the daily supply area at 1236.6-1227.7. It will be up to the individual trader whether to close his/her full position at this point, or leave some on the table to run.

Current buy/sell orders:
- Buy orders: 1208.4 [Tentative – confirmation required] (Predicative stop-loss orders seen at: dependent on where one confirms this level). 1191.3-1194.1 [Tentative – confirmation required] (Predicative stop-loss orders seen at: 1190.2).
- Sell orders: Flat (Predicative stop-loss orders seen at: N/A).
The post Tuesday 7th April: Daily technical outlook and review appeared first on .
Source:: Tuesday 7th April: Daily technical outlook and review